Related Posts Plugin for WordPress, Blogger...
Showing posts with label pie. Show all posts

Fresh Strawberry Pie (Sugar Free, Gluten-Free, Vegan)

 10.02.2011


This gelatenous little frozen dessert I had to post because although it started out as a complete experiment, it turned out to be pretty good!

Gluten-Free Crust:
1 ½ c Blanched Almond Flour
¼ c Coconut Oil, softened
2 TBS Agave Nectar
Mix in bowl Organic Strawberries and Blueberries, 10 drops liquid Stevia extract, 1 tsp. xanthan gum and 1/3 c. coconut milk.

Heat Mixture on the stove on low, until ingredients blended well.
Pour strawberry mixture into cooked crust, freeze 1 hour.

Remove, thaw and serve!

Garnish or serve with Vanilla Bean Ice Cream (Depending on your dietary needs, use a Soy, Almond, Coconut, Sugar-Free Ice-Cream)

Read more...

Peanut Butter Pie for Mikey- A Must Read!

 8.25.2011


Peanut Butter Pie for Mikey from Todd Porter & Diane Cu on Vimeo.

I ran across this video created by White on Rice Couple the other day.  Not only is it beautiful, but the tragic reality behind the creation of this video evokes raw, true, introspection and evaluation of how we live our own lives each day.  These may be strangers, but when live brings pain and suffering like this to a fellow human being, you can't help but get emotional and empathize with their hurt.  I shared this story with B last night, held him tight, and told him I never wanted a day to go by where he did not know how much I am in love with him.

Mikey, a fellow food blogger husband, died of a heart attack suddenly and without warning about a week and a half ago.  Her posts since this life-altering tragedy are inspiration to us all, not only to always pursue our dreams, but to live like each day may be our last, and never letting loved ones whom are closest to us go a day without feeling loved.  My deepest and sincerest condolences go out to Jenny, her family, and Mikey's family and friends. 

You can read posts about Mikey on Jenny's blog here.

Read more...

Addendum to Old Fashioned Coconut Cream Pie Recipe

 7.24.2011

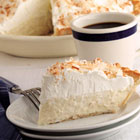
We had some friends over to our house this weekend who tasted the Coconut Cream Pie that I previously posted about.  I was so happy to see how much they enjoyed it!

My friend asked me if it had Almond in it! I told her, "You know that's weird because I tasted a hint of almond too, but no, it's Vanilla Extract."

She remained perplexed and unconvinced, insisting that she was tasting almond, so I looked at my baking cupboard at the Vanilla and Almond extract bottle.  Um, oops.  Although the recipe called for Vanilla, I used Almond! Which began to make perfect sense because I thought it was strange how I had noticed the Vanilla Extract to be clear - but quickly passed it off and assumed Imitation Vanilla Extract was just that, imitation, and thus must be clear and not brown like usual Vanilla Extract.

My mom had already read and commented to me about how when she read the post about the imitation vanilla extract - she thought to herself, uh oh. . . but I guess didn't have the heart to tell me. She remains a proud mama and supports my domestic efforts in the kitchen...

My friend then slowly put her fork down and sweetly suggested I just keep my little special secret ingredient a secret - you know like little old Italian ladies do - or the Bush's Baked Beans Dog who won't even reveal the secret as if world chaos would break out around American BBQ's....

But after careful consideration, and in the spirit of admitting my faults and domestically challenged ways, I felt the need to come clean and reveal my "mishap turned tasty miracle" so that others may too experience the joy and wonderment of this amazing dessert.  I even felt a bit like Einstein -  I mean, some of the best inventions arose from what should have been either blatant errors or casual mishaps.

And at the end of the night, when all that was left of the 9-inch glass pie pan was a shell of the last piece of pie and scattered crust crumbs, Bryan and I just had to laugh about how we will never get upset at each other when we see evidence of a plate-less snacking.  When digressed about our childhood memories of when we would get always try to get away with eating communal food straight from the dish and get scolded whenever we were caught red-handed.

The amazing thing about marrying your best friend who understands your quirky ways is that neither one of us passes judgment if we catch the other person indulging in a late night snack.  Sure, it can be embarrassing, and some may call it lazy, to be caught in the dimly-lit kitchen late at night, standing wedged between the refrigerator door illuminated only by the glow of the halogen lights, spooning bite by bite directly from the pan.  But let's face it, the fact that I made anything that is worthy of the late-night vertical snacking variety is an accomplishment in and of itself.


An on that note, I have found it to be very effective to purchase two cartons of milk, one for Bryan, and one for me. I never drink milk by itself and only use it to bake or on my cereal while Bryan prefers to chug it straight from the carton.  I think in some way it's his testosterone making a statement that he is a man, and he doesn't need a glass to drink milk.  Men's brains, unlike women's, work this way: Why go to the effort of dirtying a glass that you will later nag me to wash when I can just get it on tap?
And although there is some valid logic to that point, more than that, I just think men feel liberated chugging away, mouth to the carton, in a primal kind of way!


That being said, I know full well that for whatever reason, whether a man is a bachelor or the head of the household, he is going to continue to drink milk straight from the carton.  It's just one of those things.  So as opposed to wondering, or causing a late night secret trip to the fridge and causing anxiety and instilling fear of being caught, just get two cartons! That way, the freedom to chug is had by men, and women are free to bake and pour from their own carton without wondering whether a portion of that milk is backwash contaminated!

Read more...

Good Old Fashion Coconut Cream Pie!!!

I know, I'm getting bold....some may say I am putting the cart before the horse, or gettin' too big for my britches to think I could elevate my status to the upper eschelon of Old Fashioned Cream Pies- others more "half glass full" type may say there has to be a point you take the training wheels off, or just rip the ban-daid off! ...(my mom is from Nebraska can you tell?)

All cliches aside, I honestly and genuinely have ALWAYS wanted to try to bake Traditional, Yummy Coconut Cream Pie - No, I am not talking about Imitation Jello/CoolWhip No-Bake Cream Pie (see Chocolate Cream Pie from earlier post) ...No offense to Jello, but that pie was a sloppy, though tasty, chocolate mess!


  • Ingredients:
  • 3 cups half-and-half (I used organic, fat free half and half and it worked really well for those of you opting for a slightly healthier pie)
  • 2 eggs
  • 3/4 cup white sugar
  • 1/2 cup all-purpose flour
  • 1/4 teaspoon salt (Kosher salt!)
  • 1 cup flaked coconut, toasted
  • 1 teaspoon vanilla extract (I used imitation extract, so what...I couldn't taste the difference - the only difference I can see a imitation is clear and the real stuff is brown)
  • 1 (9 inch) pie shell, baked
  • 1 cup frozen whipped topping, thawed (You can use real whipping cream as well, but this cool whip is a lighter alternative for summer :) But if you were baking this for a holiday pie, I would suggest using the REAL stuff :)

  • Directions:


  1. In a medium saucepan, combine half-and-half, eggs, sugar, flour and salt. Bring to a boil over low heat, stirring constantly. Remove from heat, and stir in 3/4 cup of the coconut and the vanilla extract. Pour into pie shell and chill 2 to 4 hours, or until firm.
  2. Top with whipped topping, and with remaining 1/4 cup of coconut.
  3. Note: To toast coconut, spread it in an ungreased pan and bake in a 350 degree F (175 degrees C) oven for 5 to 7 minutes, or until golden brown, stirring occasionally.

I found this pie to be relatively easy to make and have to admit, I was SUPER excited about how well it came out! It set perfectly, and I have some advice on what not to do, and tips to make the process of Pie Baking a little more enjoyable!

Before you start with baking the filling, first bake the crust! I failed to do this at the beginning and then was scrambling trying to juggle the coconut toasting, the filling, and the pie crust all at once.  I made do by allowing the pie filing to cool in the refrigerator as well as put the pie crust, once baked (takes 9 minutes) to cool in the refrigerator to speed up the process.  But if you first bake the pie crust, then begin preparing the filling while toasting the coconut (5-7 minutes) then the process will work a lot smoother!

 Bringing the filling mixture to a slow boil.  IT was weird, the egg yolks did not actually burst until the pan got hot enough! I was worried there for a second and stirring ferociously trying to poke the yolks, but do not worry, once the pan gets hot enough, the yolks will dissolve and turn the mixture to a creamy off-white color.

 Super easy to toast coconut! Who knew??? Just place coconut on a cookie sheet and pop it in the oven for 5-7 minutes - KEEP YOUR EYE ON IT and stir it (I stuck my hand in the oven and used a thin spatula to move the coconut around - the flakes around the edge tend to burn quick!)

Yes, I used a store bought pie crust- I'm not freaking Martha Steward just yet and a girl has 127 things to do on a Saturday!) But it says on the instructions NOT to microwave, to let it thaw overnight (oops did't do that) So I chose to throw caution to the wind and throw the sucker in the microwave for about 2 minutes on 20% power.  It turned out JUST FINE! I'm not sure why they say you can't microwave the crust, I'm sure there is a perfectly good reason, but some of us don't have all night/day to watch it thaw.
 Here is the pie filling cooling in the refrigerator while I baked the pie crust and toasted the coconut (again, this is why you should probably do the crust and coconut first) but I think it worked really well this way too! It allowed the filling time to cool before I lumped it into the pie crust.  Then it only took like 1 hour to set perfectly! I'm all about instant gratification when it comes to tasting what I slaved over!

Pouring the pie filling first into the pie crust.  Then topped with Cool Whip (I used the entire tub because I wanted to make it high like the Marie Calendar's Pies!)

 Use remaining toasted coconut to top the cool whip with!

 Here's my first, homemade Old Fashioned Coconut Cream Pie!


Dangggg! Look at it! It's so purty!


Bryan LOVED this pie, and I have eaten 3 pieces already.  This is definitely the best pie I have tasted in a long time!

Read more...

Blog template by simplyfabulousbloggertemplates.com

Back to TOP