I know, I'm getting bold....some may say I am putting the cart before the horse, or gettin' too big for my britches to think I could elevate my status to the upper eschelon of Old Fashioned Cream Pies- others more "half glass full" type may say there has to be a point you take the training wheels off, or just rip the ban-daid off! ...(my mom is from Nebraska can you tell?)
All cliches aside, I honestly and genuinely have ALWAYS wanted to try to bake Traditional, Yummy Coconut Cream Pie - No, I am not talking about Imitation Jello/CoolWhip No-Bake Cream Pie (see Chocolate Cream Pie from earlier post) ...No offense to Jello, but that pie was a sloppy, though tasty, chocolate mess!
- Ingredients:
- 3 cups half-and-half (I used organic, fat free half and half and it worked really well for those of you opting for a slightly healthier pie)
- 2 eggs
- 3/4 cup white sugar
- 1/2 cup all-purpose flour
- 1/4 teaspoon salt (Kosher salt!)
- 1 cup flaked coconut, toasted
- 1 teaspoon vanilla extract (I used imitation extract, so what...I couldn't taste the difference - the only difference I can see a imitation is clear and the real stuff is brown)
- 1 (9 inch) pie shell, baked
- 1 cup frozen whipped topping, thawed (You can use real whipping cream as well, but this cool whip is a lighter alternative for summer :) But if you were baking this for a holiday pie, I would suggest using the REAL stuff :)
- Directions:
- In a medium saucepan, combine half-and-half, eggs, sugar, flour and salt. Bring to a boil over low heat, stirring constantly. Remove from heat, and stir in 3/4 cup of the coconut and the vanilla extract. Pour into pie shell and chill 2 to 4 hours, or until firm.
- Top with whipped topping, and with remaining 1/4 cup of coconut.
- Note: To toast coconut, spread it in an ungreased pan and bake in a 350 degree F (175 degrees C) oven for 5 to 7 minutes, or until golden brown, stirring occasionally.
I found this pie to be relatively easy to make and have to admit, I was SUPER excited about how well it came out! It set perfectly, and I have some advice on what not to do, and tips to make the process of Pie Baking a little more enjoyable!
Before you start with baking the filling, first bake the crust! I failed to do this at the beginning and then was scrambling trying to juggle the coconut toasting, the filling, and the pie crust all at once. I made do by allowing the pie filing to cool in the refrigerator as well as put the pie crust, once baked (takes 9 minutes) to cool in the refrigerator to speed up the process. But if you first bake the pie crust, then begin preparing the filling while toasting the coconut (5-7 minutes) then the process will work a lot smoother!
Bringing the filling mixture to a slow boil. IT was weird, the egg yolks did not actually burst until the pan got hot enough! I was worried there for a second and stirring ferociously trying to poke the yolks, but do not worry, once the pan gets hot enough, the yolks will dissolve and turn the mixture to a creamy off-white color.
Super easy to toast coconut! Who knew??? Just place coconut on a cookie sheet and pop it in the oven for 5-7 minutes - KEEP YOUR EYE ON IT and stir it (I stuck my hand in the oven and used a thin spatula to move the coconut around - the flakes around the edge tend to burn quick!) 
Yes, I used a store bought pie crust- I'm not freaking Martha Steward just yet and a girl has 127 things to do on a Saturday!) But it says on the instructions NOT to microwave, to let it thaw overnight (oops did't do that) So I chose to throw caution to the wind and throw the sucker in the microwave for about 2 minutes on 20% power. It turned out JUST FINE! I'm not sure why they say you can't microwave the crust, I'm sure there is a perfectly good reason, but some of us don't have all night/day to watch it thaw.
Here is the pie filling cooling in the refrigerator while I baked the pie crust and toasted the coconut (again, this is why you should probably do the crust and coconut first) but I think it worked really well this way too! It allowed the filling time to cool before I lumped it into the pie crust. Then it only took like 1 hour to set perfectly! I'm all about instant gratification when it comes to tasting what I slaved over!

Pouring the pie filling first into the pie crust. Then topped with Cool Whip (I used the entire tub because I wanted to make it high like the Marie Calendar's Pies!)
Use remaining toasted coconut to top the cool whip with!
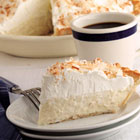
Here's my first, homemade Old Fashioned Coconut Cream Pie!

Dangggg! Look at it! It's so purty!
Bryan LOVED this pie, and I have eaten 3 pieces already. This is definitely the best pie I have tasted in a long time!


 Pouring the pie filling first into the pie crust. Then topped with Cool Whip (I used the entire tub because I wanted to make it high like the Marie Calendar's Pies!)


 Dangggg! Look at it! It's so purty!


0 comments:
Post a Comment